New Get There Connect Digital Guide
Get There Connect recently changed…for the better! A new version of the site and a Get There Connect app launched on February 1, 2026. See below for a summary of the great new features you can expect and use the drop-down sections for step-by-step instructions:
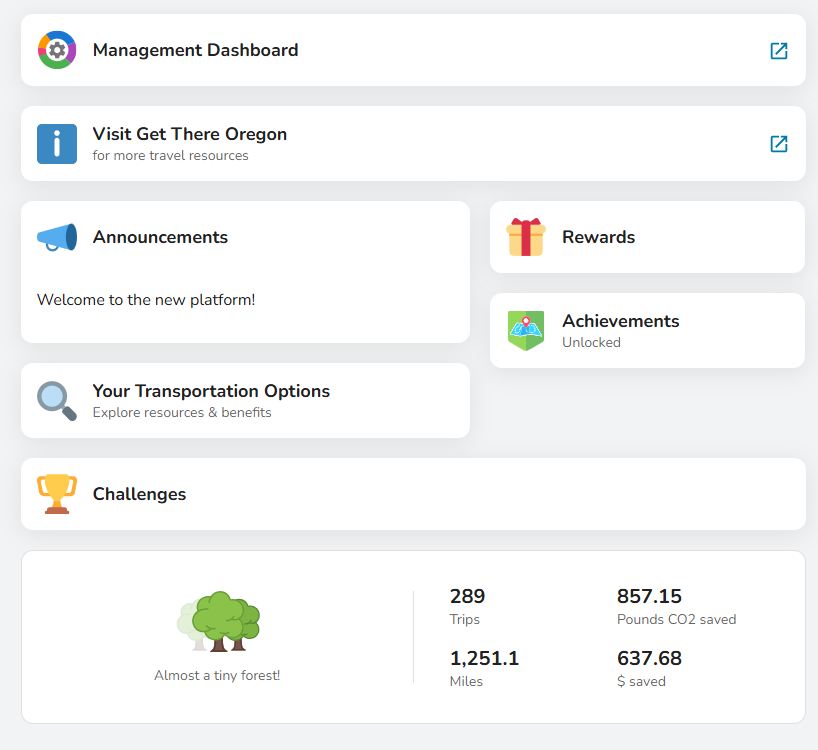
- Overall look & feel: The Dashboard is new and improved, offering easier navigation to all Get There Connect’s key features.
- New app: There is a new Get There Connect app! Those previously using Commute Tracker will need to download the new app. This app will be more user friendly and include almost all features from the desktop version! Additionally, the app allows you to track your trips live.
- Integrated trip logging: One-time trips will be integrated into the main trip planning tool.
- Integration with Google Maps: The trip planner will show previews of available trip options, but as a user selects route details, they will be launched over to Google Maps.
- Commute Perks: Users who regularly log their trips in Get There Connect will gain access to monthly perks and discounts from local businesses and global brands through a built-in reward program called Commute Perks.
- Better “pool” matching: Shared transportation options will now be referred to as “pools” throughout the new platform. The algorithm for pool matching has been improved.
If you have any questions, please contact us at [email protected].
See announcements and savings, and access rewards, achievements, commute options, and challenges all in one place, whether you’re using desktop or the new app:
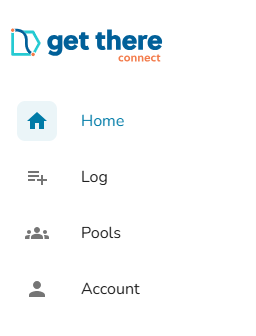
Use the lefthand menu to log trips, post and search pools, and access your account settings:
Get There Connect has a new, dedicated app! If you were previously using the Commute Tracker app, you can delete it. Follow these steps to download the new app:
- Open the App Store (iOS) or Google Play Store (Android).
- Search for ‘Get There Connect’.
- Download and install the Get There Connect app (you’ll see our logo!).
- Follow the login or registration steps in the app.
Learn how to log trips below in the “Integrated Trip Logging” section.
You can now log recurring and one-time trips all in one place. You can either log trips manually or use the app to automatically record a trip as you commute.
Manually log a trip
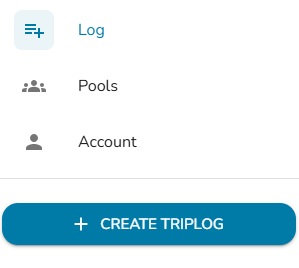
- Click ‘Log’ then ‘Create Triplog’ in the lefthand menu
- The mode will default to Bicycle. Click ‘Bicycle’ at the top to change the mode if needed. You can also add additional modes.
- Select one or multiple dates to log trips for. Note: You cannot log future trips.
- Specify whether it’s a round or single trip, arrival and departure time, starting and ending location, and trip type. Click ‘Save’.
Record a trip with the app
- Tap the ‘Record’ button in the main navigation.
- Select your mode from the available options, then begin recording your journey.
- The app will record your trip and travel time as you commute.
- When you reach your destination, tap ‘Stop’ to end the session and ‘Save’ to store your trip data.
If you’re using the carpool or vanpool mode and want to include your riders:
- Tap the ‘Add Riders’ button during your trip.
- Have each rider scan the QR code that appears on your screen.
- If you drop someone off early, tap ‘Drop off Rider’ to end their recording.
- Important: All riders need their own accounts and must be logged in to scan your QR code successfully.
Edit your trips
- Click ‘Log’ then navigate to the date of the trip you want to edit.
- Click on the trip.
- Make edits or click ‘Delete’ at the bottom. Be sure to save your changes.
The trip planner is now integrated with Google Maps.
-
- Click “Your Commute Options” on the Dashboard
- Enter a starting point and destination. One may automatically be entered for you if you’ve previously saved a commute.
- Your best options will appear and you can filter based on your preferences, including: active, quick, rewardable, flexible, cheap, and sustainable.
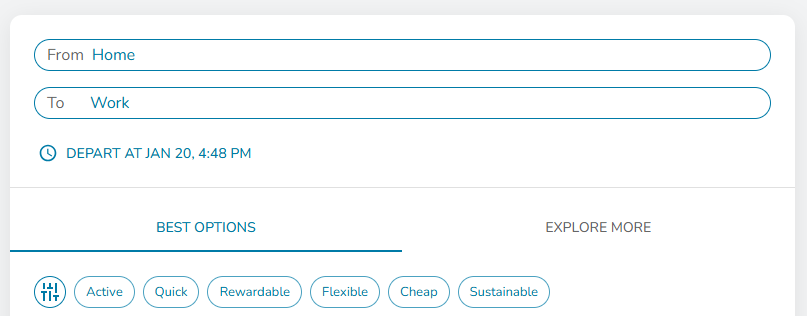
- Click on a mode for a preview of the route. You can ‘Open in Maps’ for Bike, Transit, and Drive for more detailed directions and routing.
- You can click the “Explore More” tab to see traffic conditions, bike share locations, EV chargers, Park&Ride lots, and more.
Commute Perks is a program for Get There Connect users to earn access to thousands of perks and discounts monthly from local businesses and global brands. To qualify for Commute Perks, you must log trips on at least 8 days per month. Commute Perks resets on the 1st of the month, you must redeem your Commute Perks in the month you earn them.
To access, navigate to the ‘Rewards’ section on your Dashboard to find Commute Perks. Once you meet the requirements, you’ll be able to claim unlimited perks.
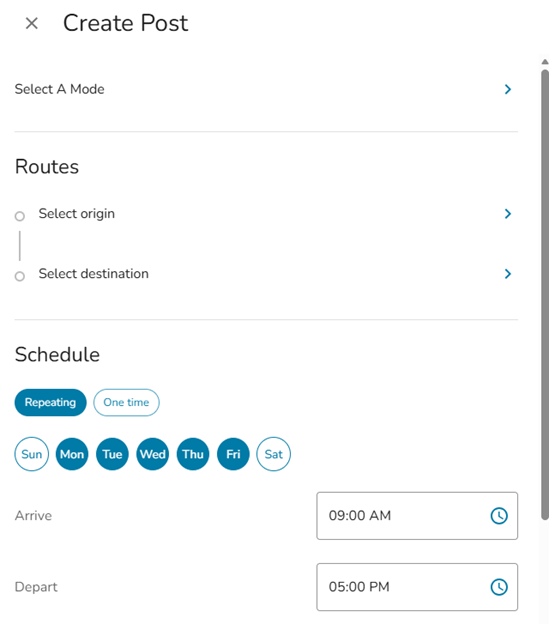
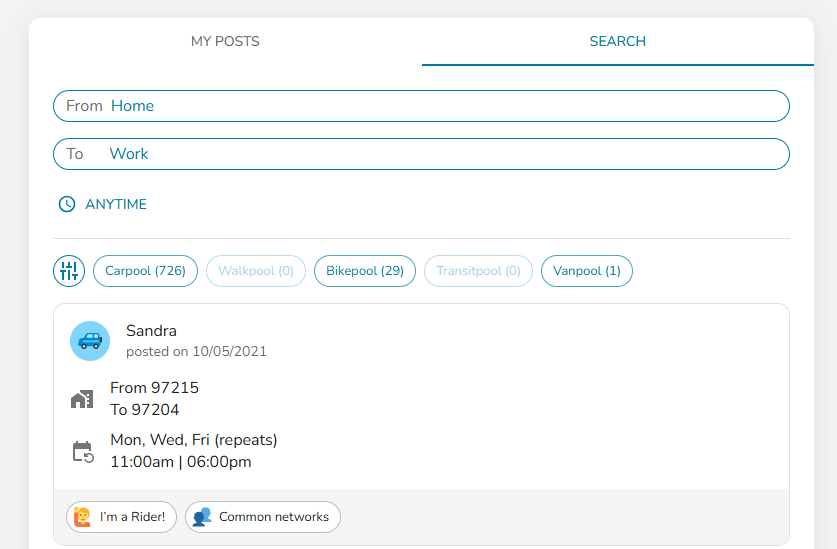
Get There Connect now offers “pools” for multiple modes, including:
- Carpooling: Share rides in personal vehicles (2-4 passengers).
- Vanpooling: Join larger group transportation (5+ passengers).
- Bikepooling: Coordinate cycling groups for safety and motivation.
- Walkpooling: Meet up with others for shared walking routes.
- Transitpooling: Meet colleagues at the transit stop and ride together.
Find a Pool
- Go to “Pools” in the lefthand menu. There, you’ll find two tabs: ‘My Posts’ and ‘Search’.
- Select ‘Search’ to explore available ride options created by others.
- You can customize your search by:
- Choosing whether you want to be matched with all users or only within specific networks (such as your company or location).
- Using filters to include or exclude vanpools.
- Adding your specific time schedule requirements.
- A list of Pool Matches will populate, if available. Click on the Pool Match card for details on the ride. For Carpool, each posting will specify whether the person is offering a ride (“I’m the Driver!”), is open to either driving or being a passenger (“I’m a Driver or Rider!”), or is seeking to be a passenger only (“I’m a Rider!”).
- Click “Message” to send a message to the Pool Match to coordinate your ride. Your message will be sent to their email inbox and your email will be provided to them to coordinate outside of the platform.
Learn more here.
Post a Pool
- Go to “Pools” in the lefthand menu. There, you’ll find two tabs: ‘My Posts’ and ‘Search’.
- Select ‘My Posts’ to post a ride to share with others.
- Enter the date, time, starting point, and destination, then click ‘Save’. Your carpool offer becomes part of the ridematching system, automatically visible to others in both ‘Explore Options’ and ‘Pools.’